Process section
In this section you can refine the contents of the initial ZIP file and add its metadata.
Single file processing
- Click on Menu > Process to see the index page.
- Click refresh button to scan to-sort folder for ZIP files and build a list.
- Click preview button to generate a preview collage image for the files present in the first page.
- Click a file name to start processing that file.

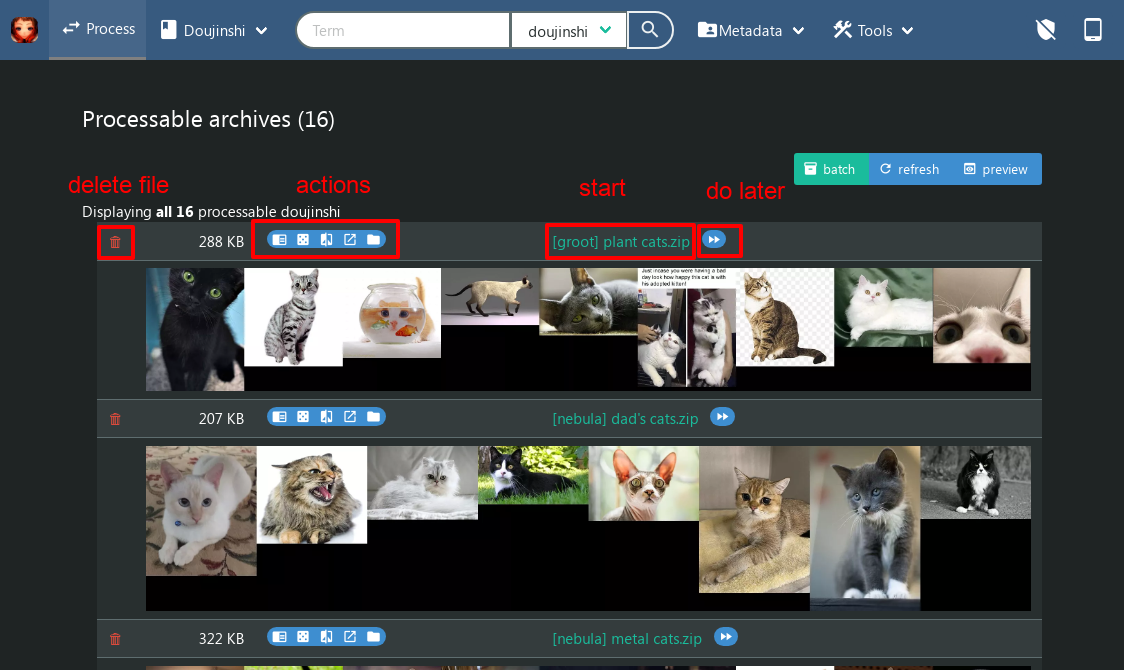
This is the index with preview images generated (on mobile a vertical image
will be shown).
- Click the bin to delete the ZIP file and remove it from list.
- With the actions buttons you can: read, random preview, compare, read in external app, open filemanager.
- Click a file name to start processing that file.
- Click on do later button to move the ZIP file in the zz_later subfolder (it will be at the end of the list).
Batch file processing
This mode prepares or completely process each selected file copying the metadata
from another already processed file.
- Click on batch button to switch to batch select mode.
- Select a group of ZIP files to be processed.
- Click prepare button to start analizing each ZIP file. Beware of the total size bacause you will need that for the subsequent decompression.

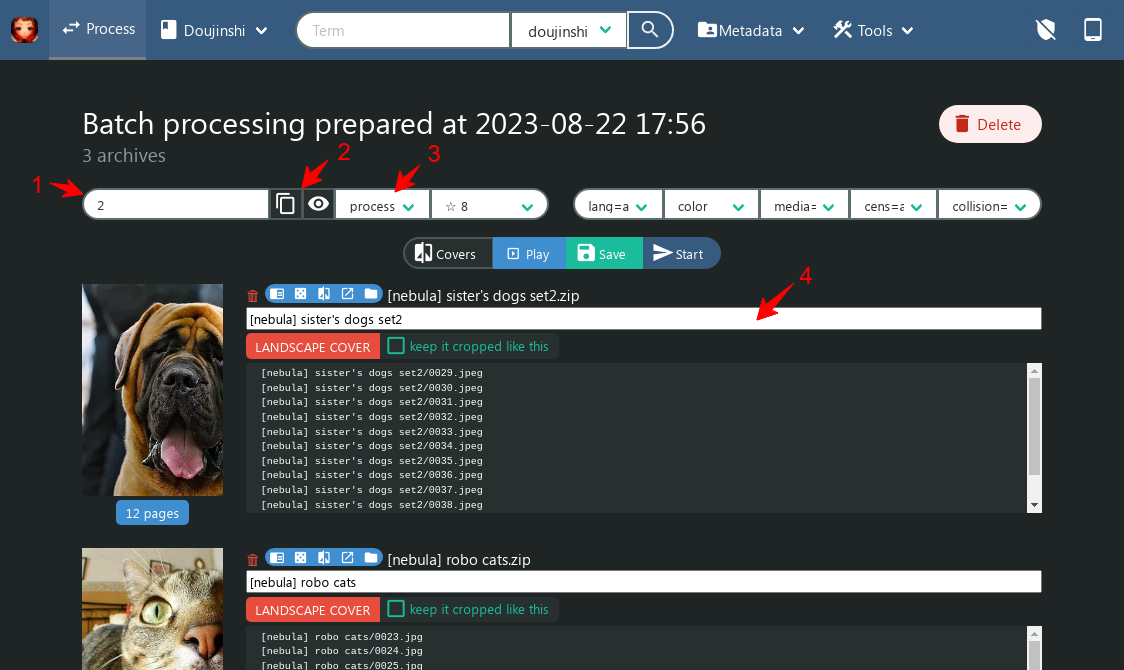
- Insert the ID of an already processed file.
- Or click the copy button to insert the last file ID processed. You can view the last processed file by clicking the eye button.
-
Choose to
prepare
or
process
each file.
Prepare: unzips the file and copies metadata for later modification and finalization. Click Menu > Process to see items currently in process.
Process: unzips the file, copies metadata, and runs the finalization (store result in collection). You can delete the original file later.
With all the informations on screen you can choose the action (prepare/process)
before starting the batch job, in addition you can:
- decide common settings to apply to all files;
- change the file name to be used later;
- remove a ZIP file from the list (does not delete the original file);
- check file names within the ZIP file;
- in case you select the Process action, you can choose to keep the landscape cover cropped as is, if not the finalization for that file will fail requiring later manual action.
Individual file processing
In this section you inspect and manipulate ZIP file contents, assign metadata and
destination folders.
The process consists in various steps identified by the tabs on top.
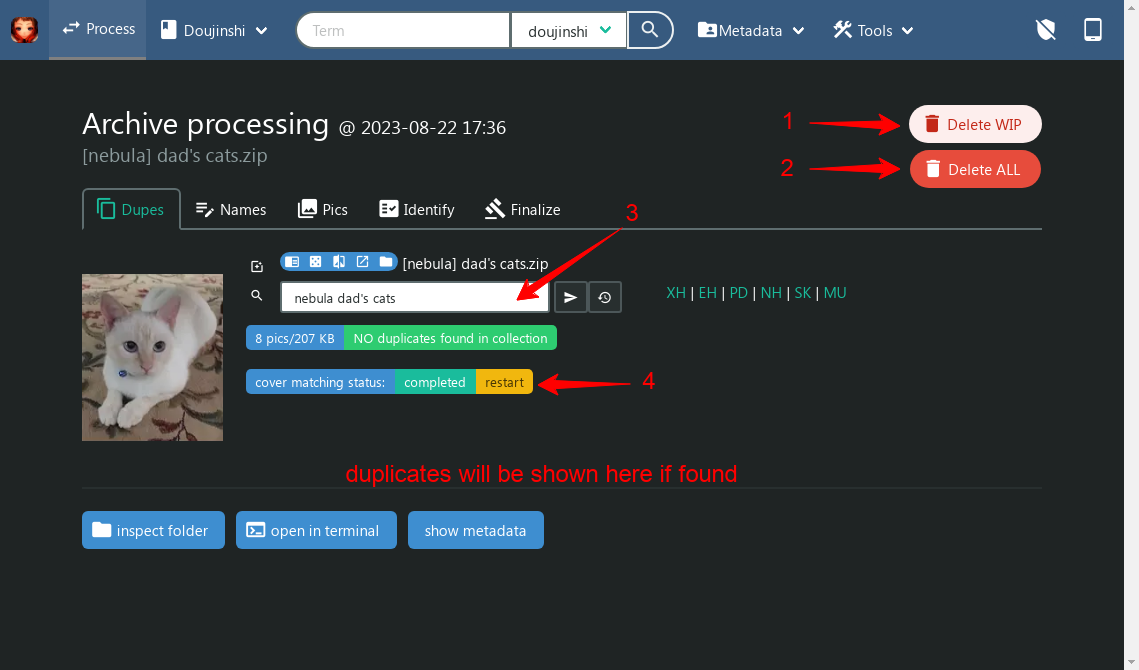
In this tab you look for duplicates and decide what to do: delete this file,
delete the file in collection, visually compare them, ...
- Click on Delete WIP button to delete this working folder.
- Click on Delete ALL button to delete this working folder and the source ZIP file.
- Use this input field to find duplicates by title.
- This line show the status of the cover matching job. You can restart it in case of need.
In this tab you can remove or rename the unzipped files.
- With this toolbar you can mass enumerate/rename all files
- Click on Edit button to selectively rename a file. A file is renamed when the input field loses its focus.

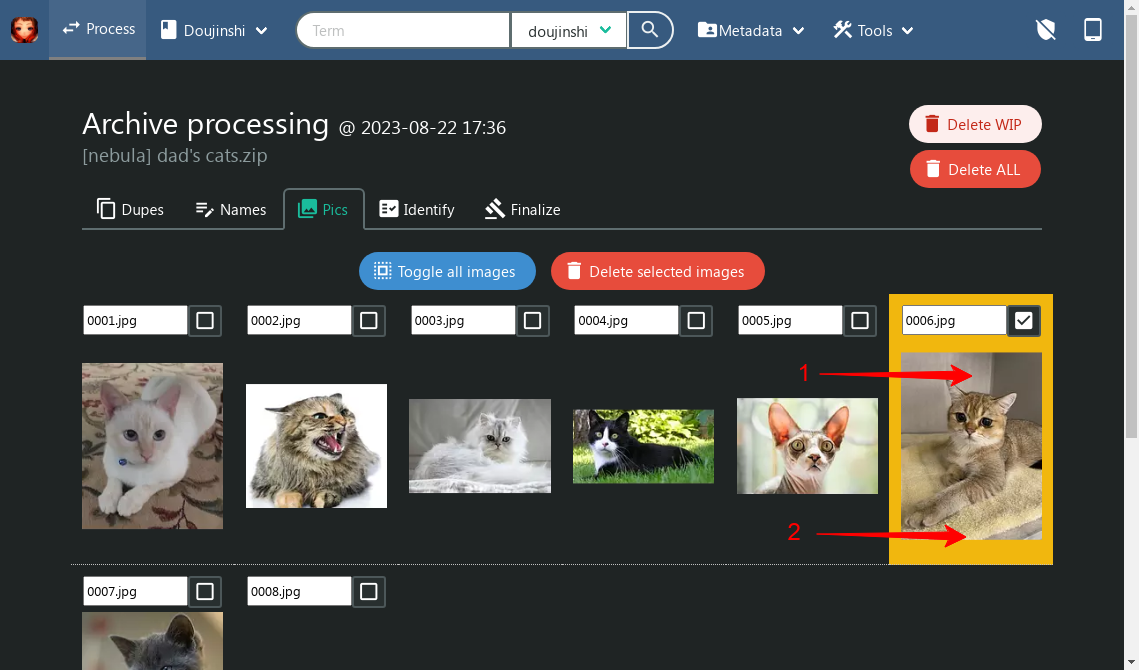
In this tab you can visually remove, rename, or zoom the unzipped images.
The default select/zoom mechanism can be selected in
Tools > Settings > process_img_sel.
- Click on the top half of the image to toggle its selection.
- Click on the lower half of the image to zoom it.
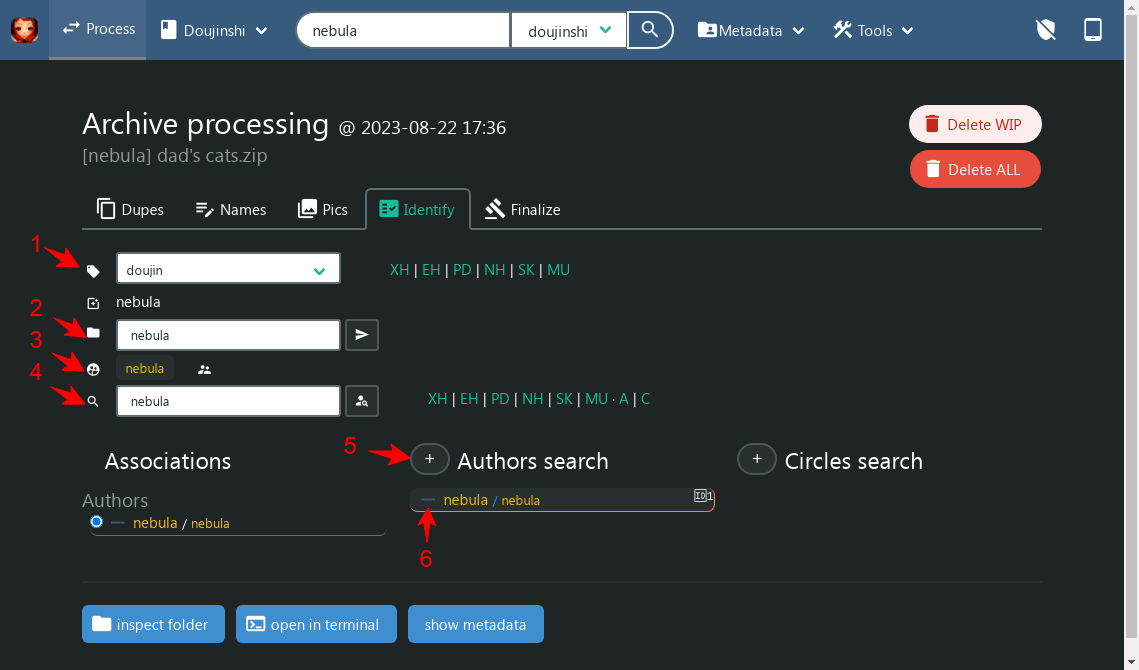
In this tab you can set the main folder destination of the ZIP file
and associate it to authors and circles (groups).
This follows the
disk folders organization
as described in the
Info
page.
- Select the category of this set (main folder).
- Input the name/series name (secondary folder).
-
Click on a
name
to search for it. This is auto pupolated from the original ZIP file name
if it is named as:
- [circle X, circle Y, ... (author A, author B, ...)] title.zip
- magazine title YYYY-MM.zip
- artbook title.zip
- Input you custom search terms.
- If the term does not exist, you can click on the plus button to create an Author/Circle from it.
- Click on the plus/minus symbols to set/remove the association to that author/circle.
- In the Associations column you can choose the principal author/circle, this merely sets the destination folder in (2).
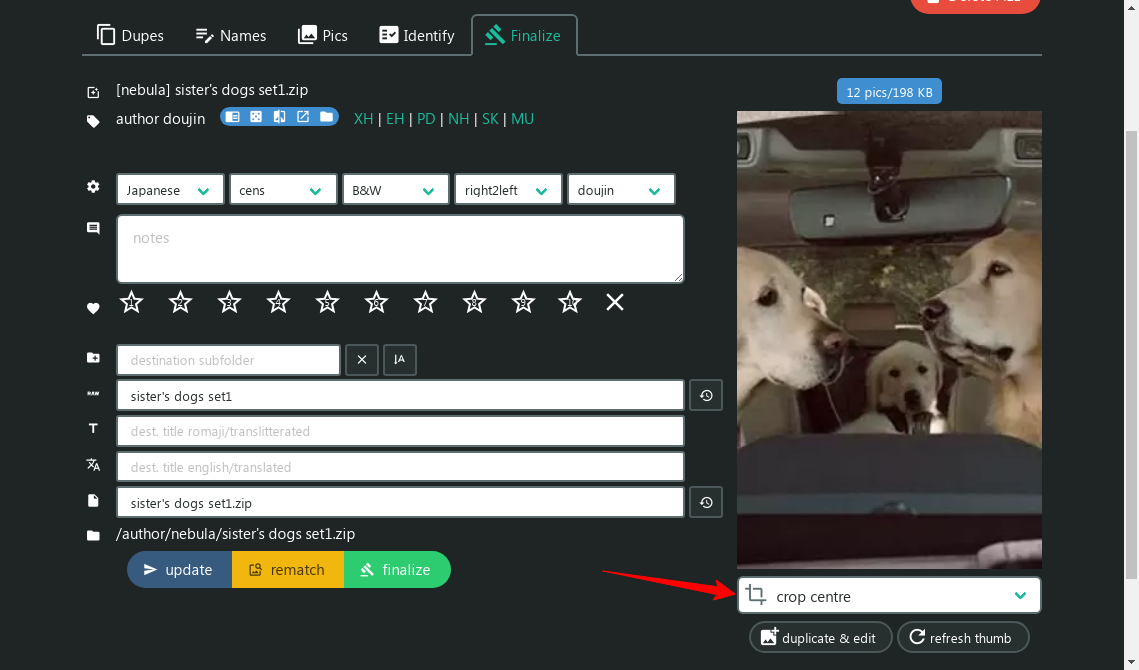
In this tab you can set metadata, score, eventual subfolder, and final ZIP file name.
In the last metadata row you can see what will be the complete path of the file in the collection.
On the lower buttons toolbar you can update the metadata, restart a cover match search, and begin the finalization process (apply previously decided actions and store in collection).
In the last metadata row you can see what will be the complete path of the file in the collection.
On the lower buttons toolbar you can update the metadata, restart a cover match search, and begin the finalization process (apply previously decided actions and store in collection).
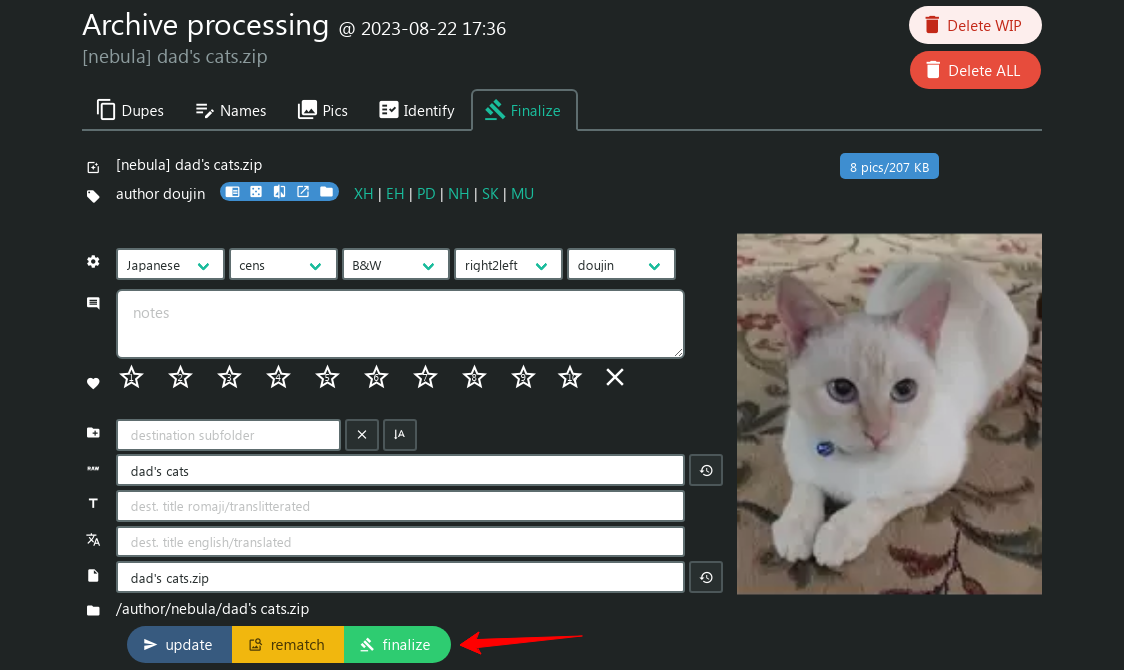
The first image of the set is used as a portrait cover, in case you have
a landscape image then in this final tab you can decide the cropping method/level
or edit it in an external application then click
refresh thumb
button.